Meet Billy The Kidd from Austin, TX, the creative force behind some of our unique Element accessories. Embracing the Texan spirit, Billy has owned his 2003 Element for over a year, racking up more than 200,000 miles as he navigates the expansive landscapes of his home state. His Element serves as a trusty companion, hauling everything he needs with its excellent storage space.
With over two years of expertise in 3D printing, Billy brings a wealth of experience to Element DIY Designs. His passion for pushing the boundaries of what’s possible with 3D printing is evident in both functional and non-functional prints. From practical accessories to intricate statues, Billy’s creations showcase the versatility of 3D printing.
A true design maverick, Billy’s focus extends beyond Element essentials. He specializes in crafting design-forward masks, reproducing movie props, and other unique pieces, all of which he proudly showcases on TikTok. His creations not only enhance the functionality of the Element but also add a touch of personality and style.
As Billy continues to push the limits of 3D printing, Element DIY Designs is privileged to collaborate with such a talented individual. His dedication to innovation and design-forward thinking brings a fresh perspective to the Honda Element community, making every drive an opportunity to showcase personalized and eye-catching accessories. Join us in celebrating Billy The Kidd’s creativity and passion for elevating the Element experience.

E-Dash Dock | Side Kick Mounting Base
Auxiliary Side Mount for Lightweight Devices
Product Overview
The Side Kick is a side-mounted accessory bracket designed to keep your phone or other small device within easy reach—without cluttering the center of your Honda Element dash.
This 3D-printed, clip-on mount installs on either side of the factory radio bezel. Its snap-on design, reinforced with automotive-grade 3M VHB tape, provides a secure, vibration-resistant fit while maintaining a low-profile, OEM-friendly appearance. The Side Kick delivers the same modular mounting flexibility as the E-Dash Dock, simply repositioned to the side of the dash.
What’s Included / What’s Not Included
Included
- 1× 3D-printed Side Kick mounting base
- Pre-applied automotive-grade 3M VHB tape
- Cleaned, inspected, and bagged part
Not Included
This product provides the mounting point only.
- ❌ Ball mounts
- ❌ Phone holders or cradles
- ❌ Hardware for attaching accessories
Optional add-on kits are available to complete your setup.
Key Features
- Clip-on installation — no drilling or permanent modifications
- Reinforced with automotive-grade 3M VHB tape for added stability
- Two integrated 1/4-20 threaded inserts for flexible positioning
- Compatible with the E-Dash Dock mounting ecosystem
- Low-profile, OEM-friendly appearance
- Fully removable if needed
Load & Use Notes
The Side Kick is designed for lightweight devices only.
Recommended: phones and small accessories
Not recommended: large tablets, heavy multi-arm setups, or long extension arms
For heavier or load-bearing setups, use the Command Panel. For center-dash mounting, the E-Dash Dock remains the correct choice.
Compatibility & Fitment
- Designed for OEM Honda Element radio bezels only
- Not recommended for aftermarket or non-OEM trim pieces
Bezel Styles
Honda Elements use two radio bezel styles:
- Smooth bezel — no lower bump
- Bumped bezel — raised lower lip at the bottom
Side Kick mounts are side-specific and bezel-specific. Left and right orientation is referenced from the driver’s seat.
How to Choose Your Side Kick Mount and Optional Kit
Follow the steps below to configure the correct Side Kick setup for your Element.
Step 1: Choose the Mount Location
- Driver side
- Passenger side
- Both sides
Step 2: Select Your Bezel Style
- Smooth bezel
- Bumped bezel
Step 3: Choose the Mount Style (Add-On)
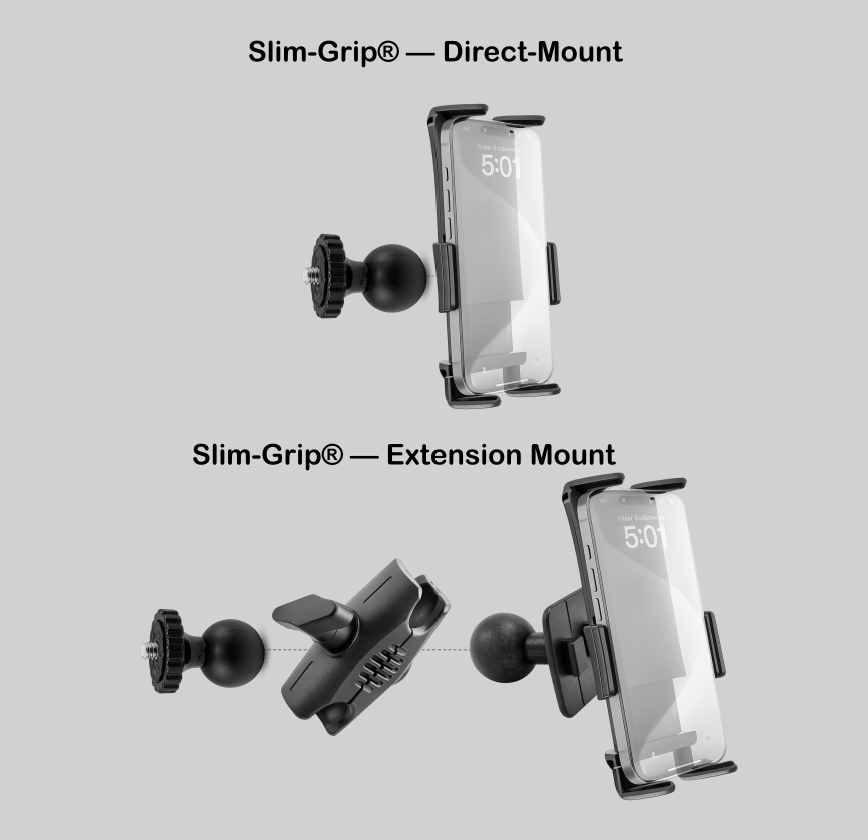
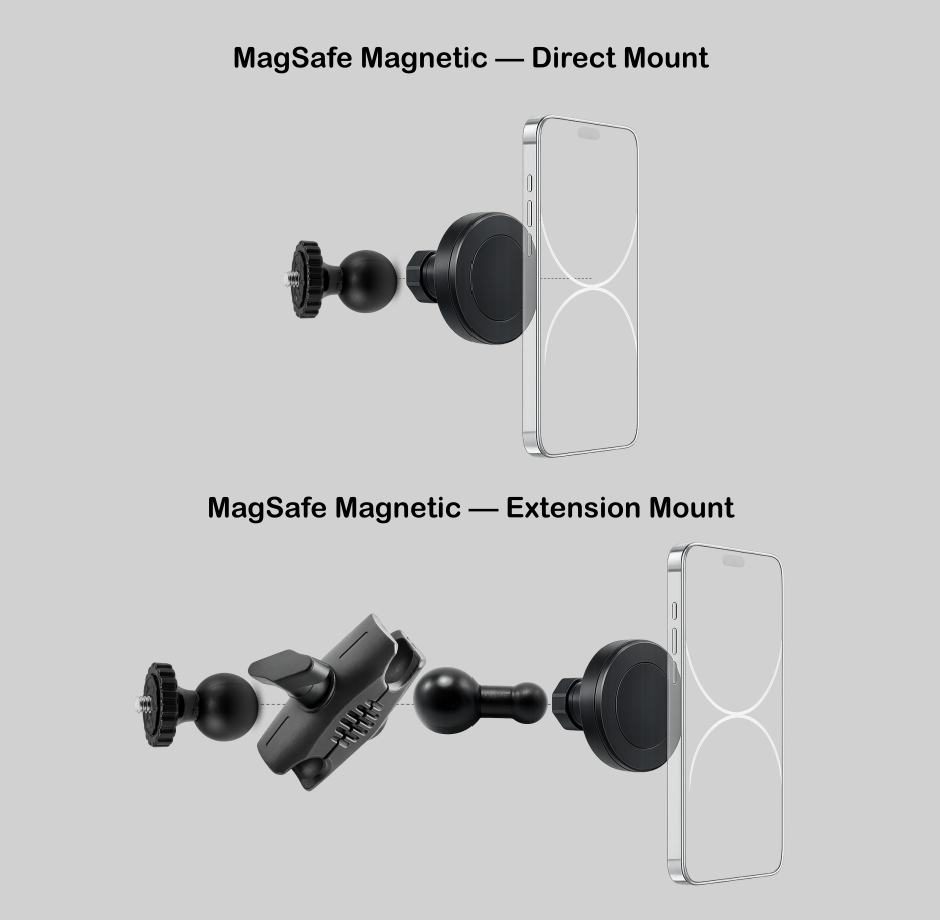
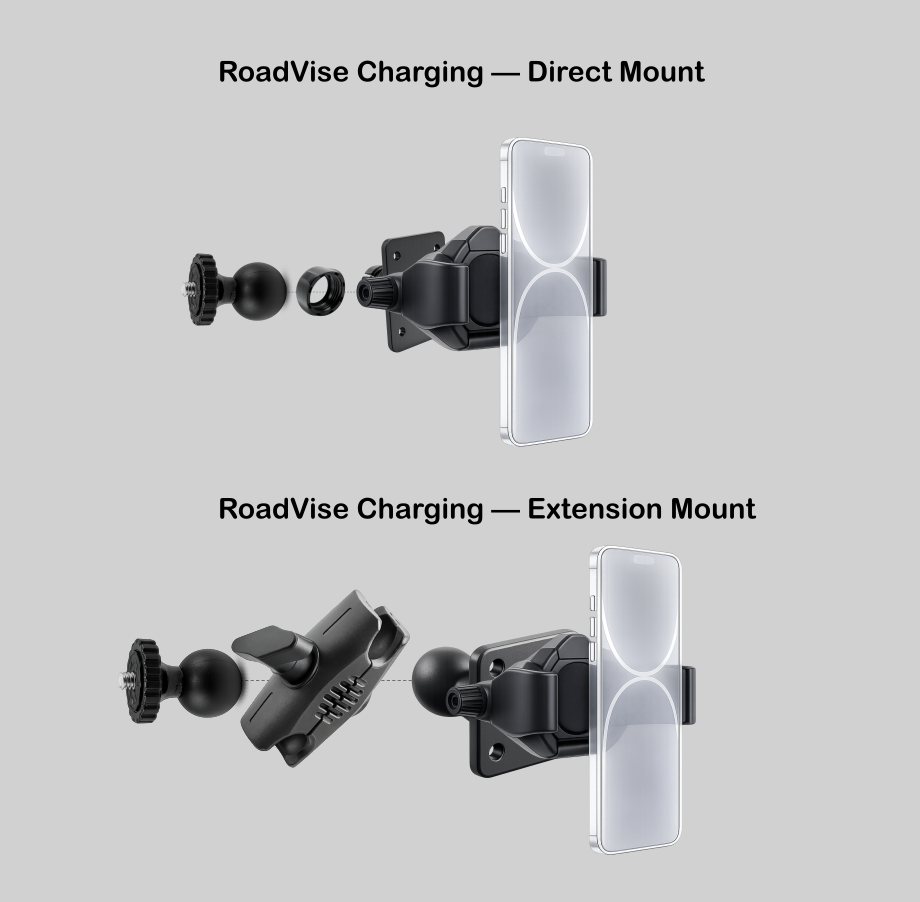
Direct Mount (17mm)
A rigid, arm-free setup using a 17mm ball mounted directly to the Side Kick bracket. This configuration prioritizes compatibility and simplicity and is required for certain mounts.
Extension Mount (25mm Arm)
Adds a Robust™ 2.75" articulating arm using a 25mm ball system, then adapts down to 17mm at the device. This option provides additional reach and adjustability and is especially useful around large aftermarket screens or custom dash layouts.
Step 4: Choose a Device Holder (Add-On)
- Slim-Grip® — Spring-loaded cradle for most smartphones
- Magnetic Phone Holder — Fast on/off mounting for lightweight phones (17mm required)
- MagSafe Charging RoadVise® — MagSafe-compatible mount (direct mount requires 17mm; charging puck and cable not included)
Compatible Add-ons (Recommended)
- Mounting balls: 17mm (Direct Mount), 25mm (Extension Mount)
- Mounting arms: short, single-joint arms up to 2.75"
- Accessories: action cameras (short arm only), small GPS units, lightweight radios
Avoid long arms and heavy accessories
FAQ — Will This Work with Aftermarket Head Units?
Yes — as long as your radio bezel is OEM or securely fastened to the vehicle.
The Side Kick mounts to the radio bezel itself, not directly to the dash structure. If your bezel is factory OEM (even with an aftermarket head unit installed), you’re good to go.
Some aftermarket bezel kits use lighter plastic or weaker attachment points. If the bezel isn’t firmly secured to the dash, the mount may feel unstable.
If your bezel feels solid when you press on it, the Side Kick will perform as intended.